🛡️ CROSSGATE: MOBILE GUIDE
B2 BOSS Fight Guide: Advanced Team Setup, Stage Clears & Survival Tactics
“Stepping up from B1, BOSS Fight Level 2 (B2) ramps up the difficulty significantly!”
Stepping up from B1, BOSS Fight Level 2 (B2) ramps up the difficulty significantly! Although it also unlocks at Level 55, the bosses here bring much higher stats and far more dangerous skill combos. But if you can clear this tier, the rewards waiting at the end are 100% worth the hustle!
🎒 Pre-Raid Prep & Setup
Because B2 punches twice as hard, queuing with a “fixed party” is pretty much mandatory. Clear comms and precise skill timing are what separate a clean run from a tragic party wipe.
1. Stats & DPS Optimization
- Defensive Stats: All characters and pets must push their Confusion Resistance and Forget Resistance as high as possible.
- For Sorcerer (Debuffers/CC Specialists): B2 bosses have thick control resistance. You’ll need at least 75% Control Penetration (pushing it to 80%+ makes life so much easier).
🍖 Recommended Buff Food:
- Pan-Roasted Duck: Boosts Attack Power (Physical DPS)
- Venison Fried Rice: Boosts Magic Damage (Magic DPS)
- Roasted Lamb Ribs: Increases Control Infliction Rate (Essential for Sorcerer!)
2. Consumable Stockpiles & Niche Pet Tactics
- Consumables: HP and MP Restoration Potions, Revive Potions, Void Potions (to dodge catastrophic nukes), and Awakening Potions (to break teammates out of crowd control during high-pressure turns).
- Recommended Pets: Water Dragon, Slime, Zombie, Mummy (Focus on high HP/STR builds equipped with Holy Shield and Guard).
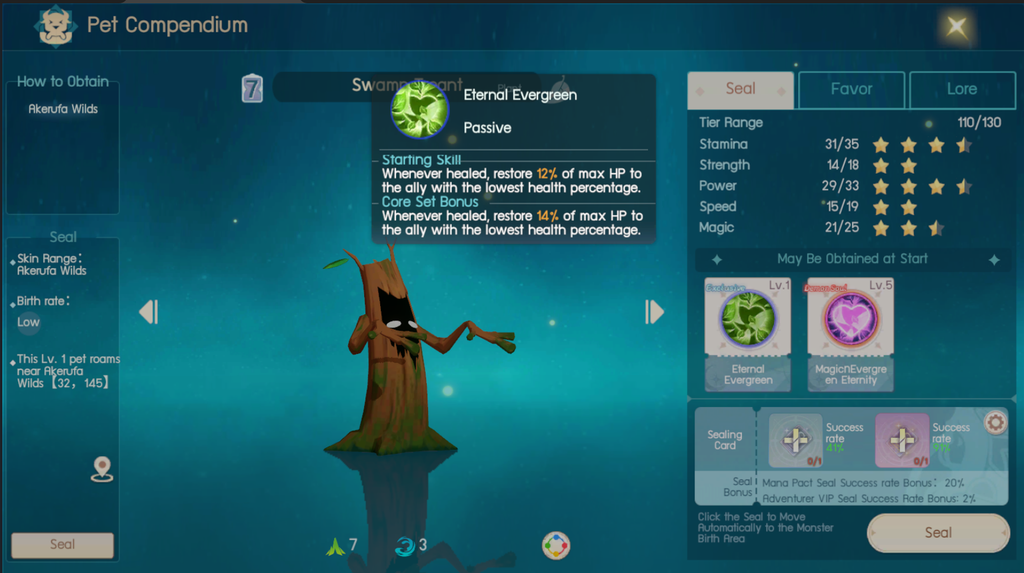
💡 Tip: “The Treant Squad” Strategy:
You can use standard Treants as specialized raid pets! Their passive talent, “Evergreen,” automatically heals the most critically wounded ally on the field. Bringing multiple Treants into the team drastically cuts down your Priest’s mana pressure and gives your squad insane survivability!
3. Recommended Team Comps
- Standard Comp: 2 Priests + 3 DPS
- Control Comp: 1 Sorcerer + 1 Priest + 3 DPS
💡 Vindicator Pro-Tip: Since all bosses in a stage share the same base resistance, always open with high-tier single-target CC skills first, as they have a higher base success rate than AoE spells.
⚔️ Detailed Boss Mechanics & Clear Strategies (B2 Tier)
🌪️ 1. Wind Minotaur
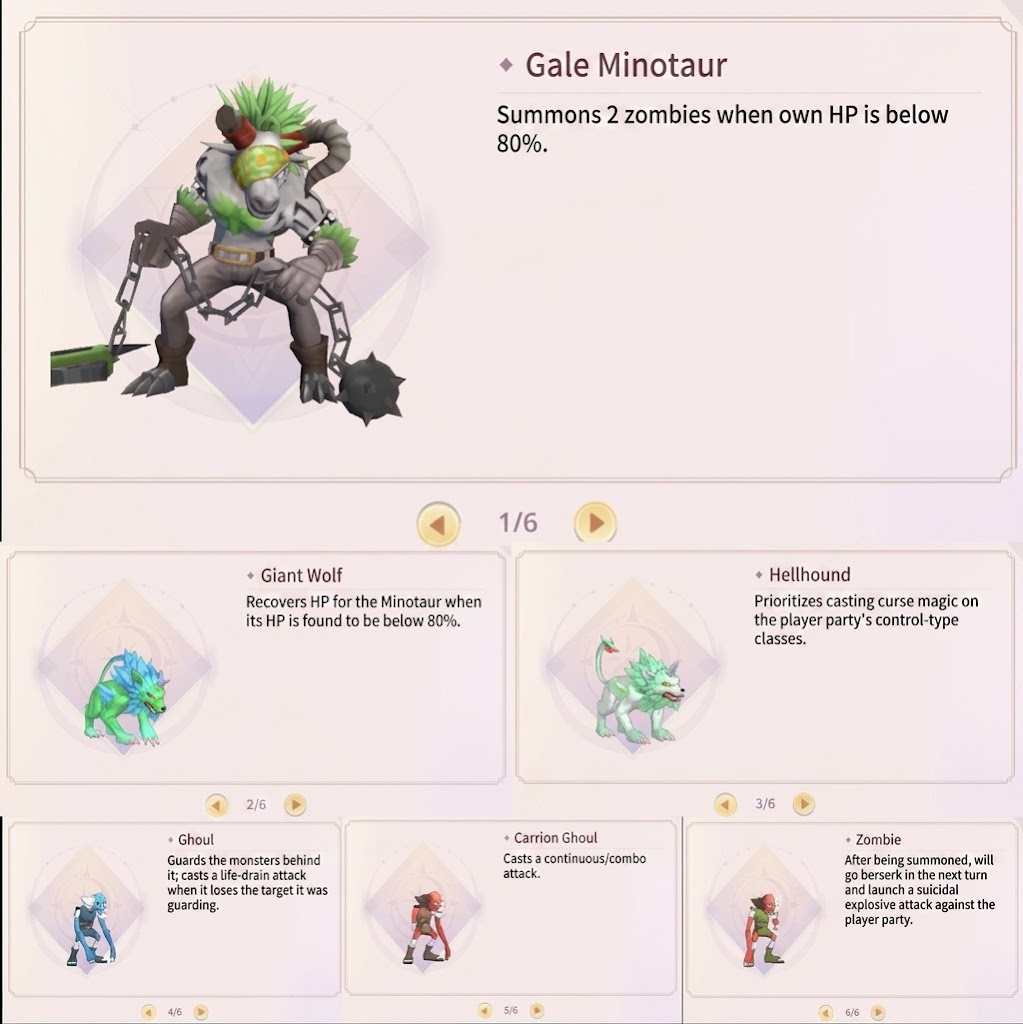
This stage is a pure test of your Vindicator’s composure. The boss MUST stay locked down at all times—no exceptions!
🎯 Kill Order:
Giant Wolf → Hellhound → Zombie → Ghoul → Wind Minotaur
🛑 Sorcerer CC Focus:
Wind Minotaur → Ghoul
💡 Core Strategy:
Focus down Dire Wolf first to stop its healing, then burst Hellhound to lower incoming magic damage. Next, clear out the Zombie, as it will try to use Guard to intercept your attacks on the Ghoul.
⚠️ CRITICAL WARNING: Your Vindicator MUST keep the Wind Minotaur CC-locked with single-target spells for the entire fight. If the boss breaks free for even a single turn, it will summon Self-Destructing Zombies that instantly wipe your entire team!
(Note: If you clear down to the Self-Destructing Zombies and at least ONE party member survives their explosion, the game automatically grants you a stage victory!)
🏴☠️ 2. Pirate Captain
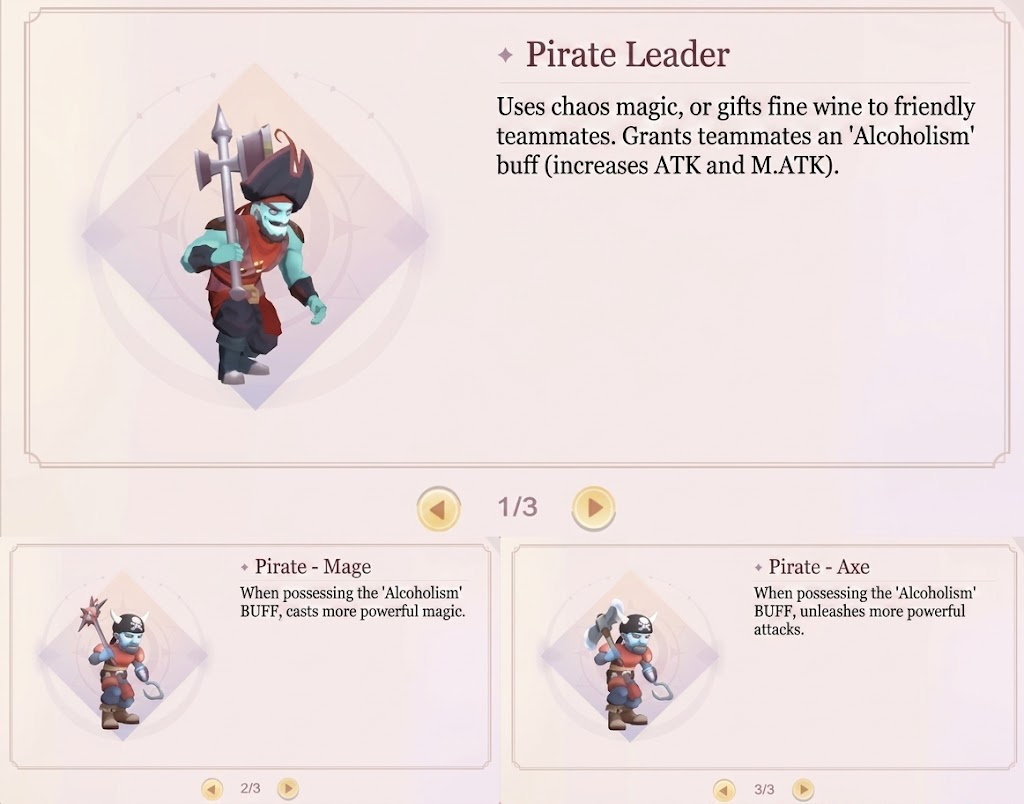
This fight is all about enduring raw damage while managing heavy status debuffs.
👥 Stage-Specific Comp: 2 DPS + 1 Priest + 2 Sorcerer
🎯 Kill Order:
Pirate Captain → Mage Pirate → Axe Pirate
🛑 Sorcerer CC Focus:
Mage Pirate → Other Pirates
💡 Core Strategy:
The Pirate Captain is your biggest threat—he spams Confusion curses and casts massive Attack buffs on his crew. He MUST be hyper-focused and killed first! In the meantime, Vindicators need to keep the Mage Pirate perma-locked. If the Mage Pirate gets buffed by the Captain, its magic damage will completely vaporize your party. Once the Captain is dead, focus the Mage Pirate down, then pick off the Axe Pirates one by one.
👥 3. Phantom (Turn 5 Time-Bomb Redux)
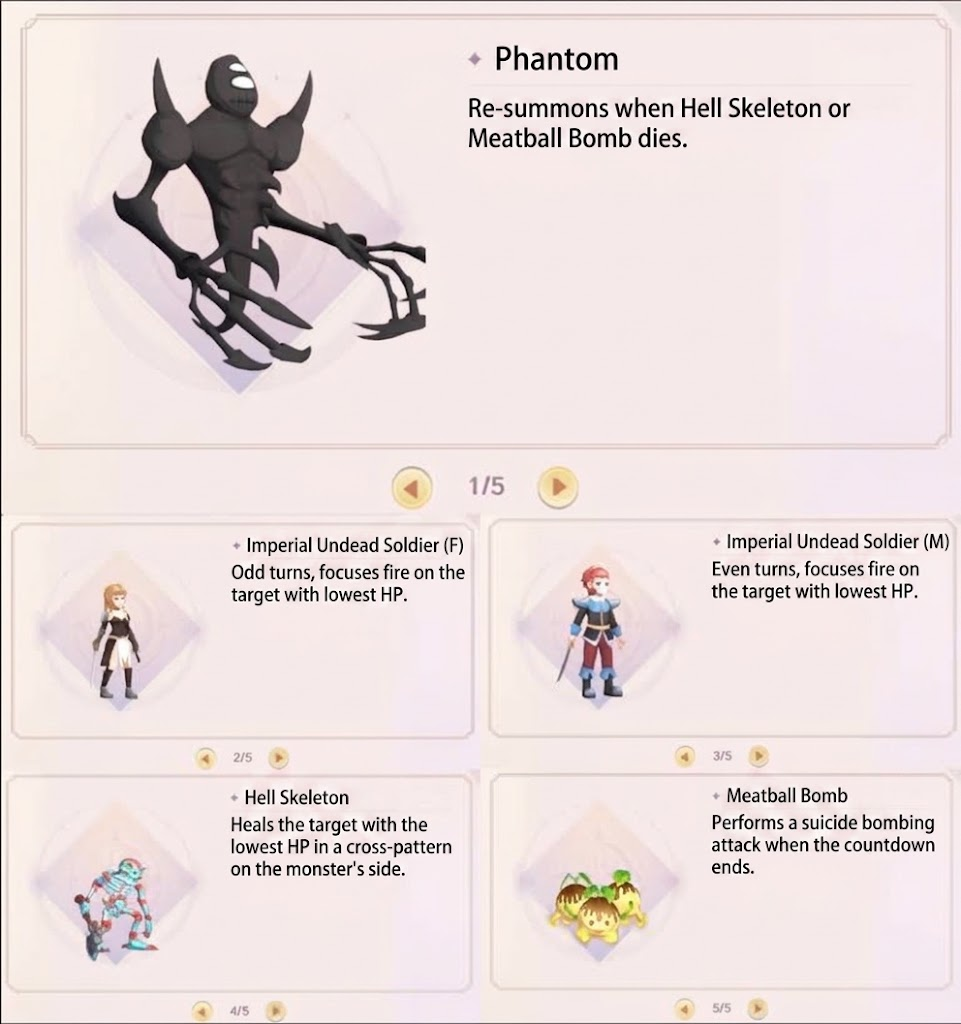
Similar mechanics to B1, but the AI is much smarter and will actively focus-fire party members with the lowest HP.
🎯 Kill Order:
Phantom → Maruko Bomb → Hell Skeleton → Remaining Adds
🛑 Sorcerer CC Focus:
Maruko Bomb → Hell Skeleton → Other Enemies
💡 Core Strategy:
The Phantom hits like a truck and summons extra adds, so burn it down first! Meanwhile, Vindicators must immediately CC-lock the Maruko Bomb to delay its 5th-turn self-destruction. Once the Phantom drops, immediately switch target to obliterate the Maruko Bomb.
🛡️ Backup Plan (If CC Fails):
On Turn 4 (1 turn before explosion), everyone pops a Void Potion. On Turn 5, command all characters and pets to Guard to survive the blast.
After surviving the bomb, take down the Hell Skeleton (Healer), then clean up the male and female Spirit Soldiers.
⚠️ Watch Out for Focus Fire: The Spirit Soldiers in B2 will coordinate attacks to snipe the lowest-HP target on your team. Teammates must use Guard to shield low-HP allies when needed.
👑 4. Margie (The B2 Capstone Boss)

The ultimate capstone fight of B2, featuring relentless damage waves and complex turn-rotation mechanics.

- Recommended Team Comp: Running 2 Sorcerers (CC/Debuffers) is strongly recommended to alternate CC lockdowns on high-threat targets.
- Kill Order: Margie (Boss) ➔ Mystery Monster (???) ➔ Bunny-Eared Mimic ➔ Green Frog Mimic ➔ Remaining Enemies
- Control Order (Sorcerers): Mystery Monster (???) ➔ Margie ➔ Green Frog Mimic ➔ Bunny-Eared Mimic
💡 In-Depth Combat Strategy
- Margie (Boss): She spams curse debuffs and can revive the Sword Squad, making her Kill Target #1.
- Mystery Monster (???): Casts Cleanse to remove CC debuffs from its allies—a Sorcerer’s worst nightmare. Lock it down immediately from Turn 1 and kill it second.
- Mimics: Have your Sorcerer CC the Green Frog Mimic while your DPS team burns down the Bunny-Eared Mimic, then switch to finish off the Green Frog Mimic.
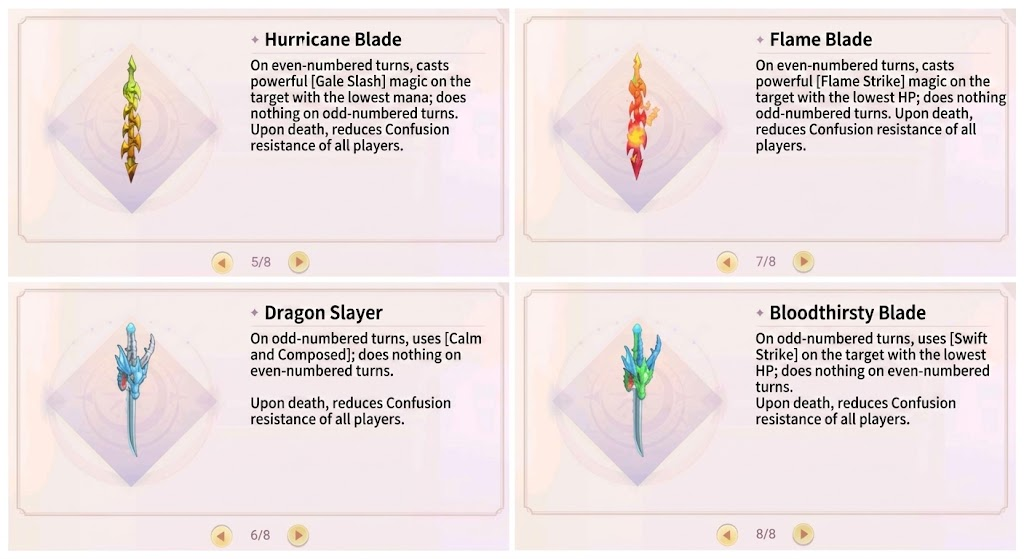
⚔️ Sword Array Rotation Strategy (Crucial for Pets)
- Odd Turns (1, 3, 5…): Dragon-Slaying Sword and Blood Sword attack ➔ Pets MUST use Guard or Protect.
- Even Turns (2, 4, 6…): Flame Sword and Wind Sword attack ➔ Pets MUST use Holy Shield.
📌 Revive-Lock Trick: Margie will only cast her team revive spell if at least 3 swords are dead. If your party is taking heavy damage, kill only 2 swords first (pick whichever type, physical or magical, counters your team) to lock her out of her revive mechanic! Focus all DPS down on Margie, kill her first, and then sweep up the remaining swords.
⚠️ Tip: On Turn 1, if your Priest or Sorcerer gets CC-locked by the enemy, any active party member MUST immediately throw a Clarity Potion to free them. Never ignore a locked healer/debuffer! A well-stocked inventory saves lives and tak
Follow for news and more information at:
🎊Facebook: Click Here!!
🗣Facebook Group: Click Here!!
📺Youtube: Click Here!!
📱Tiktok: Click Here!!
🎮Discord: Click Here!!