🛡️ [Guide] BOSS Fight Level 3 (B3) in Crossgate: Mobile
“The Falken Showdown — A Brutal Test of Raw DPS & Team Survival”
Welcome to the ultimate wall of pain: BOSS Fight Level 3 (B3), widely known among adventurers as the “Falken Showdown.” Unlike B1 and B2, this stage strips away complex trickery. Instead, it serves as a pure DPS Check and Survivability Test. If your team lacks firepower or fails to rotate revives instantly, your entire party will wipe in a heartbeat!

🎒 Pre-Raid Preparation & Setup
Given the massive jump in difficulty, queuing with random players yields an extremely low success rate. Running with a fixed party that has clear communication and verified gear score is highly recommended.
1. Recommended Team Comps
- 🛡️ Setup 1 (High Durability — Recommended for Most Teams):
- 3 DPS + 2 Priests
- ⚠️ Crucial Note: Clearing Falken with average gear is almost impossible. Your party needs at least 2 high-tier carrying players (heavy gear) to meet the strict DPS timer and clear adds in time.
- 🔮 Setup 2 (Advanced Control Comp):
- 3 DPS + 1 Priest + 1 Sorcerer (Debuffer)
- 🎯 Iron Rule: To run this setup, your Vindicator MUST reach 95%+ to 100% Control Penetration. If control fails, the boss will break free and annihilate your team with devastating counter-attacks.
2. Pet Optimization (Non-Negotiable)
- Tank Pets: Max out high-HP/STR tank pets and prepare multiple backups to swap mid-fight.
- Physical Damage Reduction: Max out your pets’ Physical Damage Reduction sub-stats to the 30% cap.
- Core Skills: Teaching pets Guard and Holy Shield is mandatory.
- Modify Skills: Equipping defense-boosting Modify Skills will keep your pets alive on the field much longer.
🍖 Recommended Buff Food:
- Pan-Roasted Duck: Boosts Physical ATK (Physical DPS)
- Venison Fried Rice: Boosts Magic Damage (Magic DPS)
- Roasted Lamb Ribs: Boosts Control Infliction Rate (Sorcerer)
3. Stockpiling Supplies (The Key to Survival)
Prepare a massive hoard of top-tier potions, especially Nirvana Potions (High-Tier Revives).
💊 Crucial Tip: Falken and his minions deal critical, team-wiping burst damage every single turn. All party members and pets must help toss revive potions. Never dump the entire reviving burden onto your Priest!
⚔️ Detailed Combat Strategy & Kill Order
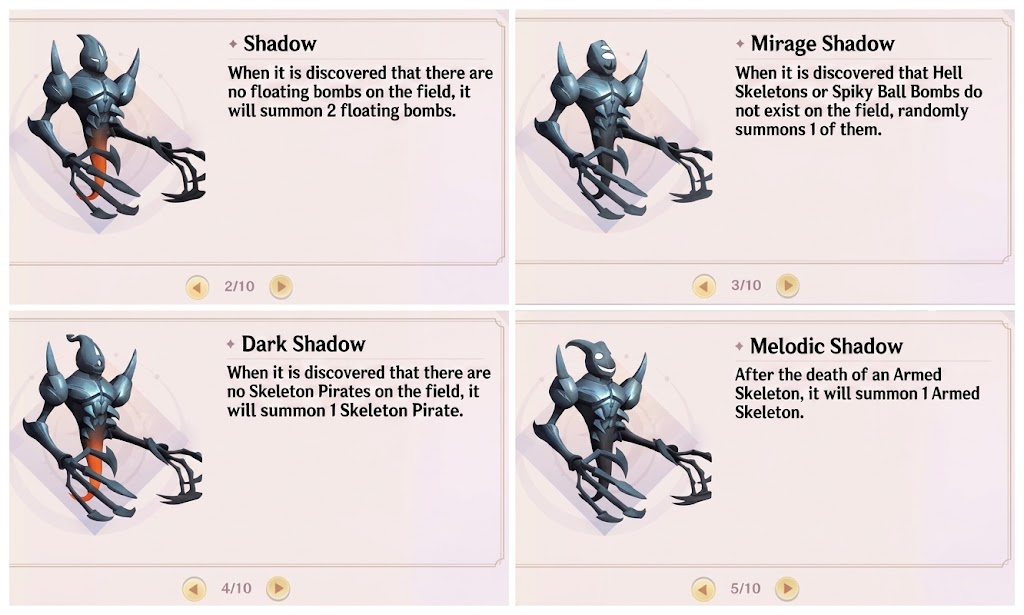
This fight relies heavily on focused Single-Target Burst to eliminate threat sources immediately. The faster you clear the backline adds, the higher your survival rate.
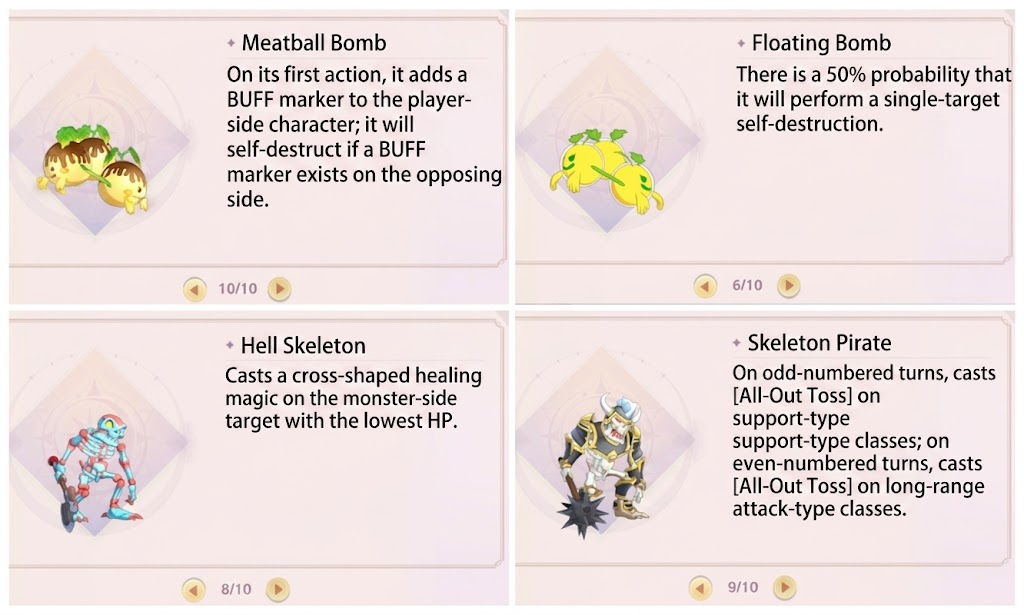
🎯 Target Kill Order: Maruko Bomb ➔ Shadow ➔ Falken (Boss) ➔ Phantom ➔ Melody Shadow / Dark Shadow ➔ Remaining Adds
💡 Step-by-Step Encounter Strategy
- Nuke the Bombs First: Every player must focus all single-target burst skills to obliterate the Maruko Bomb and Shadow on Turn 1. These two adds will completely disrupt your team’s formation if left alive.
- Burn Down Falken: Once the core threats are cleared, dump all damage into Falken. The moment Falken drops, more than half of the pressure on your Priest vanishes.
- Ignore Floating Bombs: Floating Bombs will spawn to disturb your party—do NOT waste damage on them! Their self-destruct mechanic will clear them automatically later. Save all your DPS for primary targets.
🚑 The “Nirvana Potion” Revive Rotation: Falken’s raw damage can execute party members in a single turn. The moment a teammate drops, do not wait for the Priest to cast a revive! Any active teammate or pet must throw a Nirvana Potion immediately. This frees up your Priest to cast AoE Heals and stabilize the team’s HP pool.
🏁 Final Clean-up: Once Falken and the explosive adds are dead, sweep through the Phantom, Melody Shadow / Dark Shadow, and clean up any remaining trash mobs to claim your B3 victory!
Follow for news and more information at:
🎊Facebook: Click Here!!
🗣Facebook Group: Click Here!!
📺Youtube: Click Here!!
📱Tiktok: Click Here!!
🎮Discord: Click Here!!