🛡️ CROSSGATE: MOBILE GUIDE
🛡️ CROSSGATE: MOBILE GUIDE
“B1 BOSS Fight Guide: Team Setup, Stage Clears & Detailed Survival Tips”
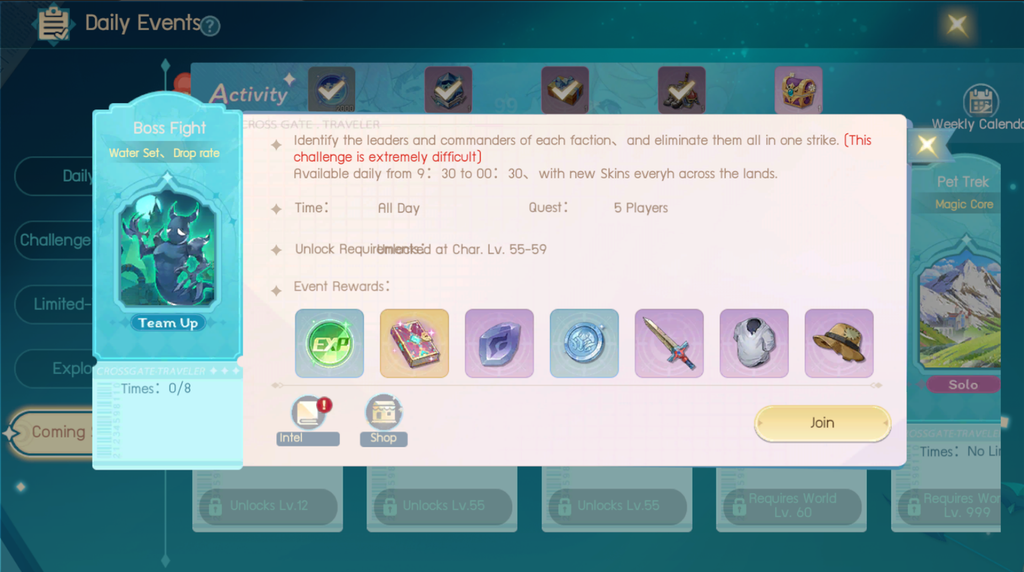
BOSS Fight is a high-octane weekly event that unlocks once adventurers reach Level 55+. The difficulty spans 5 tiers (commonly known in the community as B1 through B5), and trust us—the rewards are 100% worth the hustle! While B1 is the entry-level tier, don’t get reckless. Sloppy planning or underestimating the mechanics can easily lead to a full party wipe!
🎒 Pre-Raid Prep & Setup
Because Boss Fights push your squad to the limit, we highly recommend queuing up with a fixed party. Voice comms and real-time execution are the absolute keys to victory here!
1. Stats & Buffs Check
- Defensive Stats: All characters and pets should aim for at least 50% Confusion Resistance.
- For Sorcerer (CC Specialists): Aim for 60%+ Control Penetration (70%+ makes the run an absolute breeze).
🍖 Recommended Food & Consumables:
- Pan-Roasted Duck: Increases Attack Power (Physical DPS).
- Venison Fried Rice: Increases Magic Damage (Magic DPS).
- Roasted Lamb Ribs: Boosts Control Infliction Rate (A must-have for Vindicators/Debuffers!).
2. Pets & Stockpiles
- Pets: Bring multiple high-HP/high-STR tank pets equipped with “Guard” or “Holy Shield”.
- Inventory: Load up on HP, MP, and Revive potions.
🧪 Clutch Consumables:
- Void Potion: Grants immunity to dodge massive, un-dodgeable nuke attacks.
- Awakening Potion: Cleanses crowd-control (CC) debuffs from key teammates (e.g., your Priest or Main Carry).
3. Recommended Team Comps
- Safe Comp: 2 Priests + 3 DPS
- Control Comp: 1 Sorcerer (70%+ Control Penetration) + 1 Priest + 3 DPS
⚔️ Detailed Boss Mechanics & Clear Strategies (B1 Tier)
🐭 1. Rat King
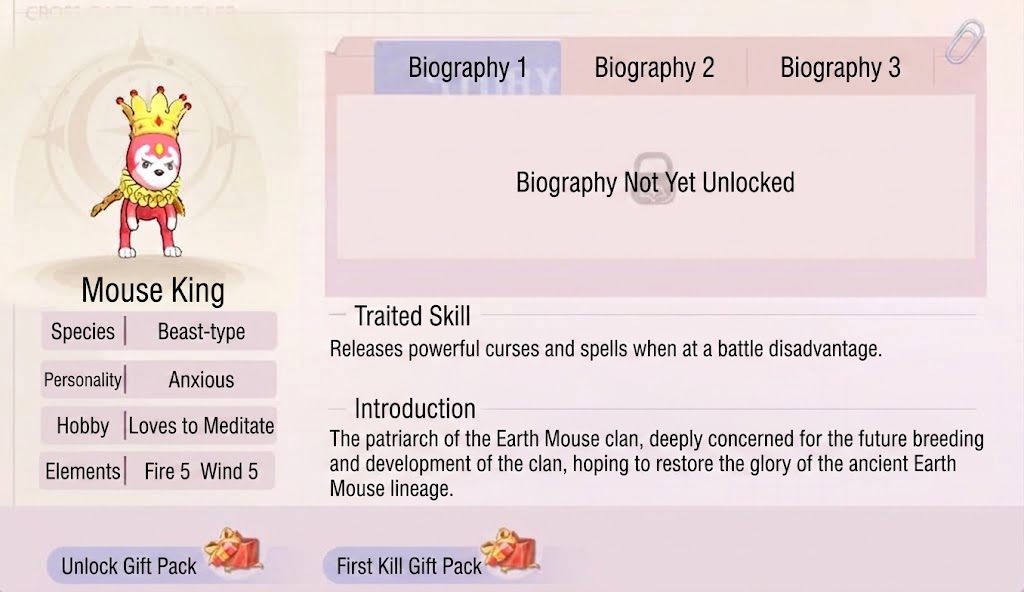
This stage isn’t too tough. The rat mob deals mostly Magic Damage, so having your pets spam “Holy Shield” will drastically soak up incoming damage. (High-geared parties can easily smash this stage running 1 Priest + 4 DPS).
🎯 Kill Order:
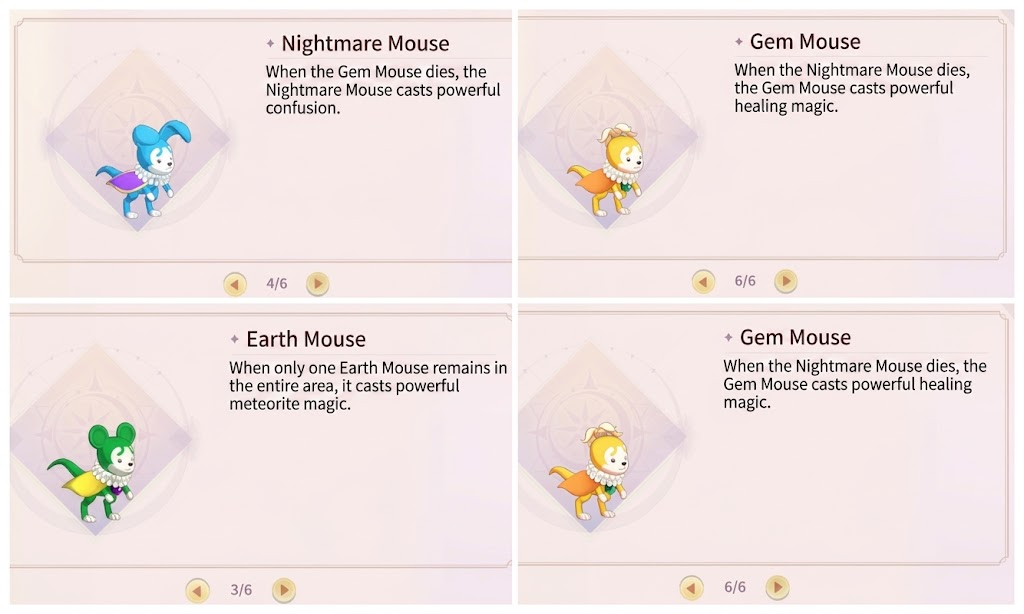
Nightmare Rat → Gem Rat → Rat King → Azure Rat → Earth Rat / Flame Rat
💡 Core Strategy: Focus down Nightmare Rat first to stop its annoying CC spells. Next, snipe Gem Rat to cut off their healing, then dogpile the Rat King and clean up the rest of the mob.
📦 2. Pure White Mimic
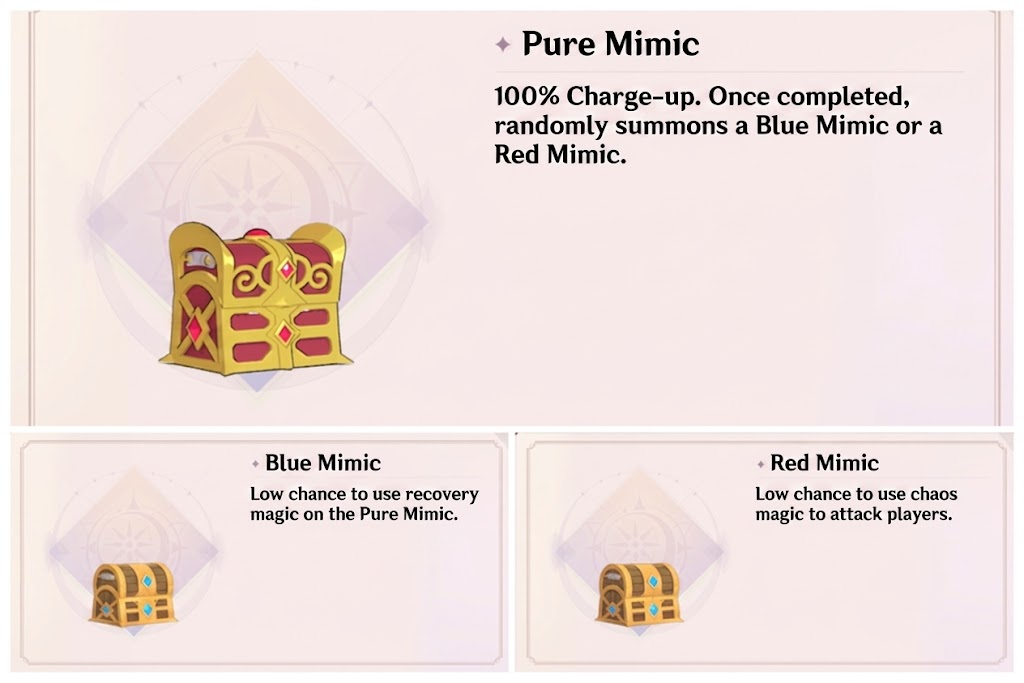
Get ready for a total magic-spam fiesta. Since all enemies deal heavy magic damage, put all pets on Holy Shield duty right from the start.
🎯 Kill Order:
Pure White Mimic → Red Mimic → Blue Mimic
💡 Core Strategy: You MUST burst down the Pure White Mimic in turn 1-2! If you leave it alive, it will continuously charge up and summon Red and Blue Mimics infinitely. Once the White Mimic is destroyed, just sweep up the rest in order.
🐂 3. Ice Minotaur
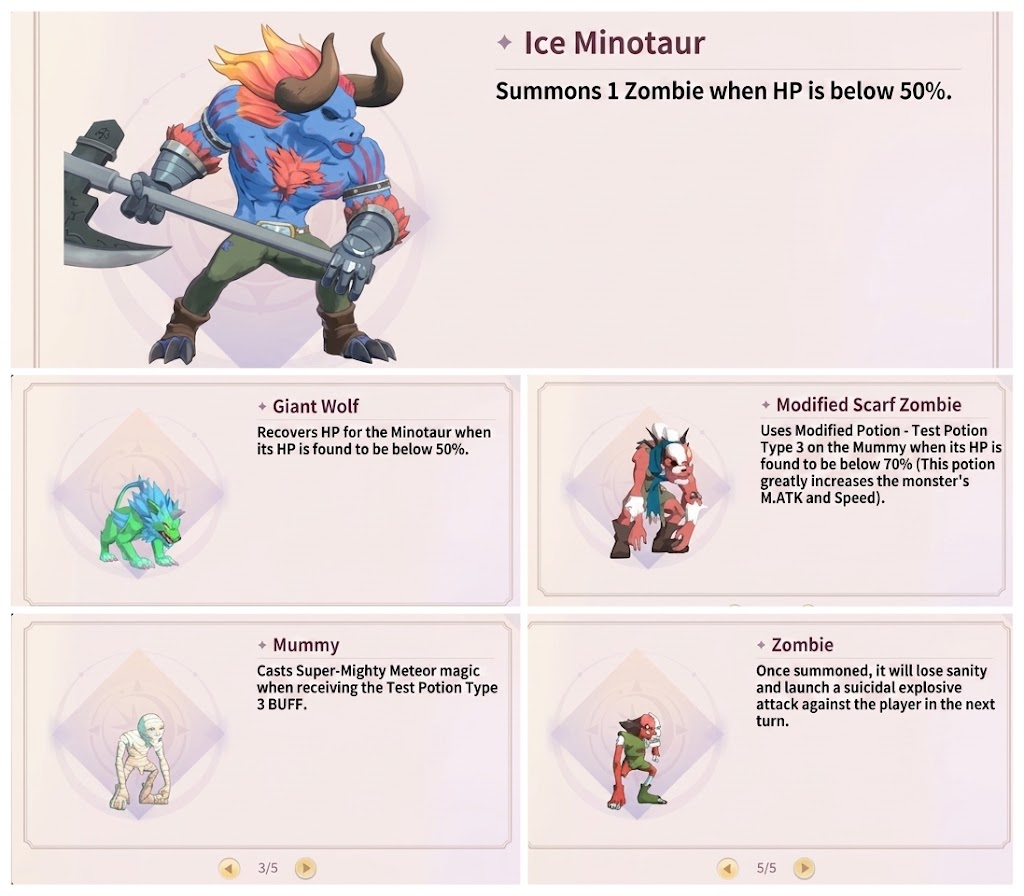
This stage is a true test for your Vindicators. Enemies rely heavily on magic, so pet Holy Shields are still essential.
🎯 Kill Order:
Bandaged Zombie → Dire Wolf → Mummy → Ice Minotaur
💡 Core Strategy: Focus Bandaged Zombie to block incoming curses, then cut down Dire Wolf to strip their healing, and pick off the Mummies one by one.
⚠️ Beware of Buffed Mummies: When a Mummy takes Mutation Medicine, it casts a devastating Meteor spell. Have your Vindicator keep them CC-locked to relieve pressure on the party.
📌 Ice Minotaur Mechanics: The Minotaur has a massive HP pool and summons adds once its HP drops below 50%. Since its damage is pretty low, have your Vindicator keep it perma-CC’d (frozen/stunned) on the right side while the DPS clears all minions first. Once the arena is clear, gang up on the boss!
👥 4. Phantom (The DPS-Check & Time Bomb)
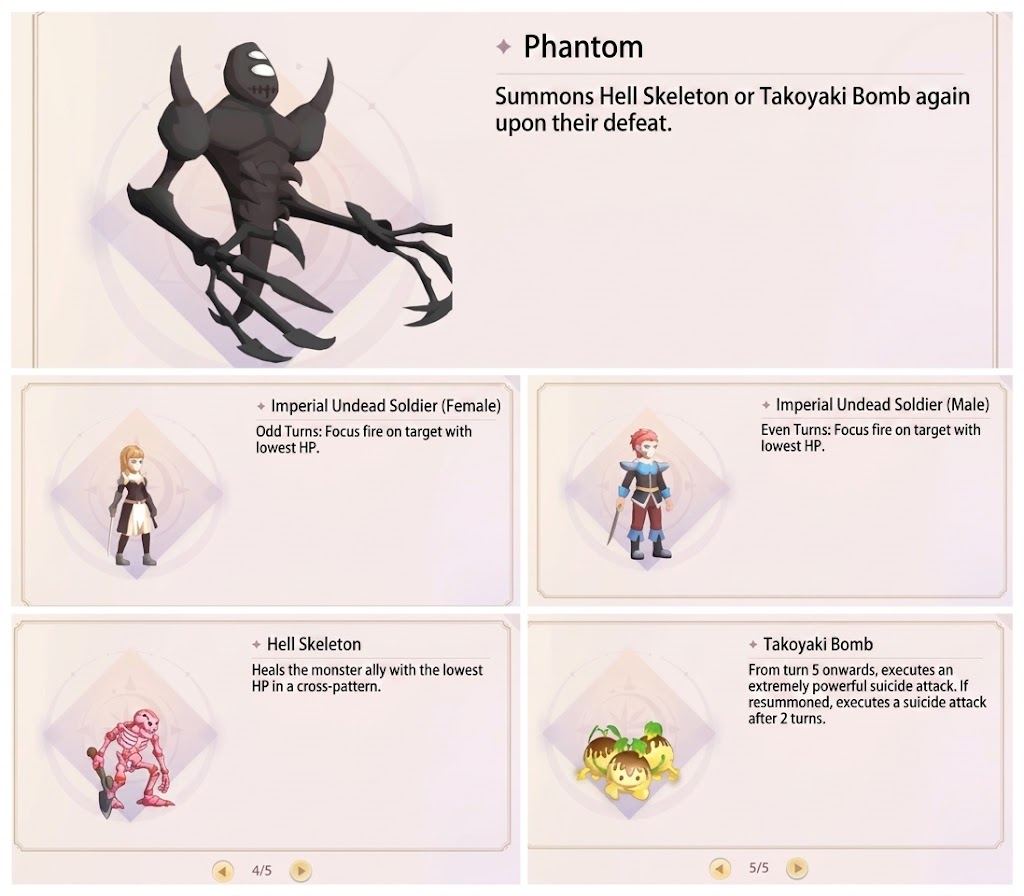
The hardest stage in B1! This fight relies entirely on your squad’s speed and coordination to defuse a ticking time bomb.
🎯 Kill Order:
Phantom → Maruko Bomb → Hell Skeleton → Spirit Soldier
🛑 Sorcerer CC Focus:
Maruko Bomb → Hell Skeleton → Other Enemies
💡 Core Strategy & Bomb Mechanics:
The “Maruko Bomb” self-destructs on Turn 5, dealing team-wiping damage. Your main priority is to obliterate both the Phantom and the Maruko Bomb before Turn 5 hits.
✅ Safest Strategy:
• Turn 1: Vindicator locks down the Maruko Bomb with CC. All DPS focus single-target burst to melt the Phantom.
• Once the Phantom drops, immediately switch focus and burst down the Maruko Bomb. Securing these two kills guarantees a win!
🛡️ Backup Plan (If CC Fails):
If your CC fails to land on the Maruko Bomb and Turn 5 is approaching:
• Turn 4 (1 turn before boom): Every member pops a Void Potion on themselves.
• Turn 5 (Boom turn): Everyone commands their character/pet to Guard. This reduces incoming damage and lets your party survive the explosion.
Once the bomb threat is neutralized, take down the Hell Skeleton (Healer), then casually sweep up the male and female Spiri
Follow for news and more information at:
🎊Facebook: Click Here!!
🗣Facebook Group: Click Here!!
📺Youtube: Click Here!!
📱Tiktok: Click Here!!
🎮Discord: Click Here!!
“B1 BOSS Fight Guide: Team Setup, Stage Clears & Detailed Survival Tips”
BOSS Fight is a high-octane weekly event that unlocks once adventurers reach Level 55+. The difficulty spans 5 tiers (commonly known in the community as B1 through B5), and trust us—the rewards are 100% worth the hustle! While B1 is the entry-level tier, don’t get reckless. Sloppy planning or underestimating the mechanics can easily lead to a full party wipe!
🎒 Pre-Raid Prep & Setup
Because Boss Fights push your squad to the limit, we highly recommend queuing up with a fixed party. Voice comms and real-time execution are the absolute keys to victory here!
1. Stats & Buffs Check
- Defensive Stats: All characters and pets should aim for at least 50% Confusion Resistance.
- For Vindicators (CC Specialists): Aim for 60%+ Control Penetration (70%+ makes the run an absolute breeze).
🍖 Recommended Food & Consumables:
- Pan-Roasted Duck: Increases Attack Power (Physical DPS).
- Venison Fried Rice: Increases Magic Damage (Magic DPS).
- Roasted Lamb Ribs: Boosts Control Infliction Rate (A must-have for Vindicators/Debuffers!).
2. Pets & Stockpiles
- Pets: Bring multiple high-HP/high-STR tank pets equipped with “Guard” or “Holy Shield”.
- Inventory: Load up on HP, MP, and Revive potions.
🧪 Clutch Consumables:
- Void Potion: Grants immunity to dodge massive, un-dodgeable nuke attacks.
- Awakening Potion: Cleanses crowd-control (CC) debuffs from key teammates (e.g., your Priest or Main Carry).
3. Recommended Team Comps
- Safe Comp: 2 Priests + 3 DPS
- Control Comp: 1 Sorcerer (70%+ Control Penetration) + 1 Priest + 3 DPS
⚔️ Detailed Boss Mechanics & Clear Strategies (B1 Tier)
🐭 1. Rat King
This stage isn’t too tough. The rat mob deals mostly Magic Damage, so having your pets spam “Holy Shield” will drastically soak up incoming damage. (High-geared parties can easily smash this stage running 1 Priest + 4 DPS).
🎯 Kill Order:
Nightmare Rat → Gem Rat → Rat King → Blue Rat → Dirt Rat / Flame Rat
💡 Core Strategy: Focus down Nightmare Rat first to stop its annoying CC spells. Next, snipe Gem Rat to cut off their healing, then dogpile the Rat King and clean up the rest of the mob.
📦 2. Pure White Mimic
Get ready for a total magic-spam fiesta. Since all enemies deal heavy magic damage, put all pets on Holy Shield duty right from the start.
🎯 Kill Order:
Pure White Mimic → Red Mimic → Blue Mimic
💡 Core Strategy: You MUST burst down the Pure White Mimic in turn 1-2! If you leave it alive, it will continuously charge up and summon Red and Blue Mimics infinitely. Once the White Mimic is destroyed, just sweep up the rest in order.
🐂 3. Ice Minotaur
This stage is a true test for your Vindicators. Enemies rely heavily on magic, so pet Holy Shields are still essential.
🎯 Kill Order:
Bandaged Zombie → Dire Wolf → Mummy → Ice Minotaur
💡 Core Strategy: Focus Bandaged Zombie to block incoming curses, then cut down Dire Wolf to strip their healing, and pick off the Mummies one by one.
⚠️ Beware of Buffed Mummies: When a Mummy takes Mutation Medicine, it casts a devastating Meteor spell. Have your Vindicator keep them CC-locked to relieve pressure on the party.
📌 Ice Minotaur Mechanics: The Minotaur has a massive HP pool and summons adds once its HP drops below 50%. Since its damage is pretty low, have your Vindicator keep it perma-CC’d (frozen/stunned) on the right side while the DPS clears all minions first. Once the arena is clear, gang up on the boss!
👥 4. Phantom (The DPS-Check & Time Bomb)
The hardest stage in B1! This fight relies entirely on your squad’s speed and coordination to defuse a ticking time bomb.
🎯 Kill Order:
Phantom → Maruko Bomb → Hell Skeleton → Spirit Soldier
🛑 Vindicator CC Focus:
Maruko Bomb → Hell Skeleton → Other Enemies
💡 Core Strategy & Bomb Mechanics:
The “Maruko Bomb” self-destructs on Turn 5, dealing team-wiping damage. Your main priority is to obliterate both the Phantom and the Maruko Bomb before Turn 5 hits.
✅ Safest Strategy:
• Turn 1: Vindicator locks down the Maruko Bomb with CC. All DPS focus single-target burst to melt the Phantom.
• Once the Phantom drops, immediately switch focus and burst down the Maruko Bomb. Securing these two kills guarantees a win!
🛡️ Backup Plan (If CC Fails):
If your CC fails to land on the Maruko Bomb and Turn 5 is approaching:
• Turn 4 (1 turn before boom): Every member pops a Void Potion on themselves.
• Turn 5 (Boom turn): Everyone commands their character/pet to Guard. This reduces incoming damage and lets your party survive the explosion.
Once the bomb threat is neutralized, take down the Hell Skeleton (Healer), then casually sweep up the male and female Spirit Soldiers!